A Small-Space Potato Setup That Hills Easily and Harvests Cleanly
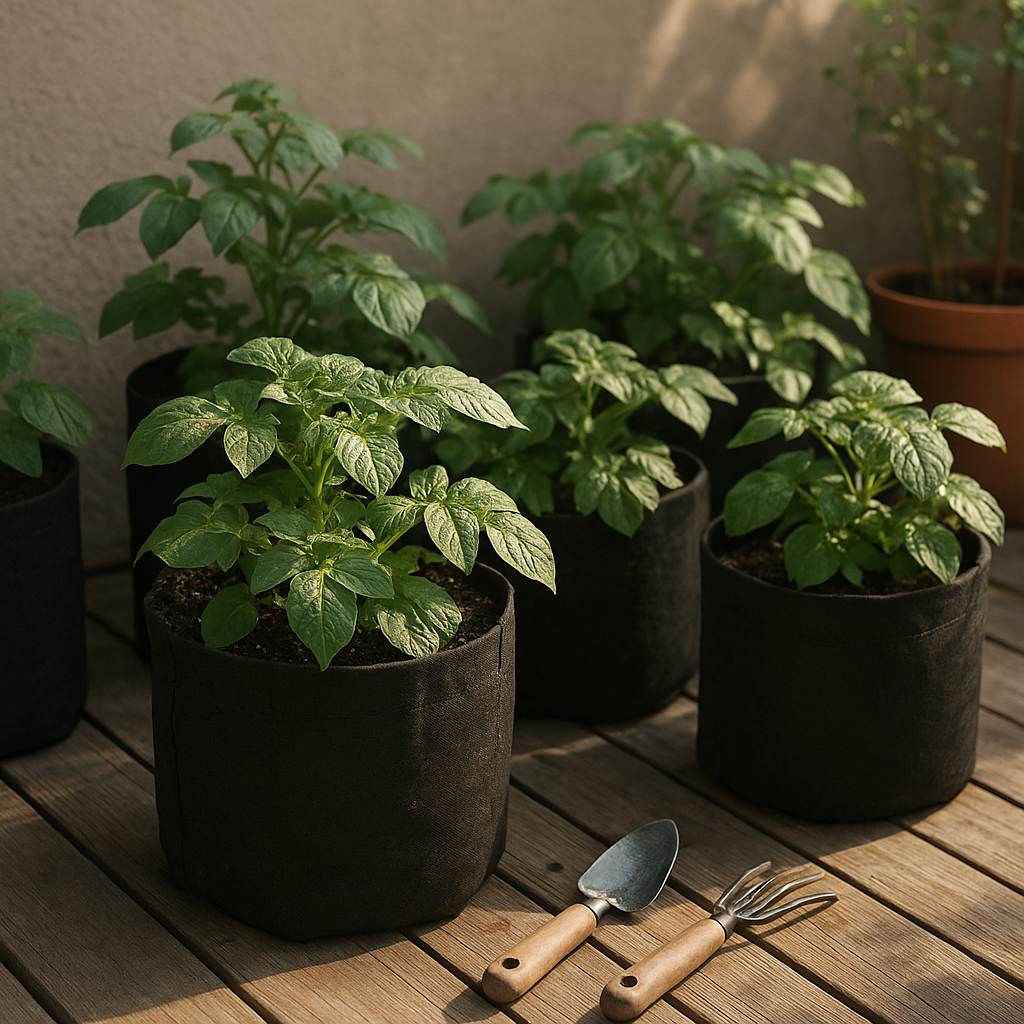
Grow bags make a lot of sense for potatoes. They drain faster than rigid containers, they are easier to store in the off-season, and they let you grow a worthwhile crop on a patio, driveway edge, or sunny corner that would never become a garden bed.
They also create a few specific problems if the setup is wrong. Bags dry out faster in wind, poor planting depth can expose developing tubers to light, and soggy mix can still lead to rot if drainage is blocked or watering gets sloppy. If you want a useful harvest, build the bag around steady moisture, enough room for roots, and a hilling routine that keeps tubers covered.
The short answer
- Use a fabric grow bag that is large enough to hold steady moisture and root space.
- Plant certified seed potatoes rather than grocery store potatoes when possible.
- Start with a shallow soil layer, then add mix gradually as stems grow.
- Keep the potting mix evenly moist, not soaked and not bone dry.
- Keep all forming tubers covered so they do not turn green in the light.
- Harvest after the tops die back, or earlier if you want small new potatoes.
If those six things are right, growing potatoes in bags is much simpler than most people expect.
Why grow bags work well for potatoes
Potatoes want loose growing medium, decent depth, and consistent moisture. A good grow bag gives them all three without the compaction problems that happen in heavy ground or the drainage issues that happen in sealed containers.
- Fabric sides improve airflow: the root zone is less likely to stay swampy after watering.
- The bags are easy to place: patios, porches, and small sunny spaces can all work.
- Harvesting is simpler: you can tip out the bag instead of digging through hard soil.
- Storage is easier: empty bags fold flat when the season is over.
If you are deciding between containers, the older guide on growing potatoes in buckets helps show where rigid buckets and fabric bags differ.
Choose the right grow bag size
Small bags make potato growing much harder because moisture swings get extreme fast. A larger bag gives the plants more root room and gives you more margin before the mix dries out.
For most home growers, a bag in the 10 to 15 gallon range is a practical starting point. That is usually enough room for a few seed potatoes without crowding them into a stressed, underperforming root zone.
- 10 gallon bags: good for compact setups and a modest harvest.
- 15 gallon bags: easier to manage for moisture and usually more forgiving.
- Tiny bags: possible, but they tend to dry too quickly and limit yield.
Whatever size you choose, do not overstuff it with seed potatoes. Crowding gives you more stems but not always more usable tubers.
Use seed potatoes, not random sprouting kitchen potatoes
Certified seed potatoes are the cleaner choice because they are sold for planting and are less likely to bring disease problems into your container setup. Grocery store potatoes may still sprout, but they are not the most reliable starting point.
Choose firm seed potatoes with healthy eyes. Small ones can usually be planted whole. Larger ones can be cut so each piece has one or two strong eyes, but let the cut surfaces dry before planting so they are less prone to rot in wet mix.
Best potting mix for potato grow bags
Use loose potting mix rather than dense garden soil. Potatoes swell more cleanly in a light mix, and roots struggle less when the bag is watered often.
- Use fresh, well-draining potting mix.
- Mix in compost if you want more organic matter, but do not turn the bag into heavy mud.
- Avoid a very rich, high-nitrogen mix that pushes leaves hard but not tubers.
- Make sure excess water can leave the bag freely instead of pooling underneath it.
Set the bag where it gets plenty of sun and where runoff can drain away instead of collecting under the base.
How to plant potatoes in grow bags
- Fill the bottom of the bag with about 4 to 6 inches of potting mix.
- Place the seed potatoes on the mix with the eyes facing up.
- Space them so they are not touching and have room to form tubers.
- Cover with another 3 to 4 inches of mix.
- Water enough to settle the mix without soaking it into a swamp.
You do not fill the whole bag on day one. The usual method is to start lower, then keep adding mix as the stems grow. That hilling process protects forming tubers from light and gives the plant more covered stem area to work with.

How and when to hill potatoes in grow bags
Once the stems put on several inches of growth, add more mix around them and leave only the top few inches exposed. Repeat that process as the plants keep growing until the bag is close to full.
The goal is not to bury the whole plant at once. The goal is to gradually cover the lower stem while keeping enough leafy growth above the surface to fuel the plant.
- Start hilling when stems are roughly 6 to 8 inches tall.
- Cover the lower growth but leave the top leaves exposed.
- Repeat as needed until the bag is nearly full.
- Check after heavy watering or settling so tubers never end up exposed.
If tubers catch light, they turn green and should not be eaten. That is one of the main reasons careful hilling matters in bags.
Watering is where most grow-bag potato problems begin
Grow bags drain well, which is useful, but it also means they can dry much faster than people expect. Potatoes do not like sitting in soggy mix, yet they also respond badly to repeated dry swings. Uneven moisture can reduce yield and lead to rough, split, or undersized tubers.
Aim for evenly moist mix from top to root zone. Check with your finger before watering. If the top layer is drying and the bag feels lighter, water slowly and deeply until the mix is fully moistened.
Hot, windy weather changes the rhythm fast. If summer heat hits before the crop finishes, use the same logic covered in How Often Should You Water Container Plants in Hot Weather? so the bag does not swing from dust dry to soaked.
Feeding and sunlight
Potatoes need good light and enough nutrition to keep growing, but more fertilizer is not always better. Too much nitrogen can make the tops look impressive while the harvest underneath stays mediocre.
- Give the bag full sun when possible.
- Use a balanced fertilizer lightly if the potting mix is not already feeding the crop.
- Back off high-nitrogen feeding once top growth is strong.
- Do not let nearby plants shade the bag during the main growing stretch.
Common grow-bag potato problems and quick fixes
The plants look healthy, but the harvest is tiny
This usually comes from bags that are too small, too many seed potatoes in one bag, inconsistent moisture, or weak light. The fix is usually more root room and steadier watering, not more random fertilizer.
The lower mix stays wet for too long
The bag may be sitting in trapped runoff, the mix may be too dense, or watering may be too frequent. Raise the bag slightly if needed, use looser mix next time, and stop watering on autopilot.
Tubers are green near the top
They were exposed to light. Add more mix while the plants are still growing and check after settling so developing potatoes stay covered.
The plants wilt every afternoon
Check the mix before assuming the problem is disease. Bags in sun and wind can dry out quickly, especially once the plants are large. If the root zone is dry, your watering rhythm is too light or too shallow.
The seed pieces rot instead of sprouting
Cold, overly wet mix is usually the cause. Plant into loose mix, avoid drenching the bag early, and let cut seed pieces dry before planting.
When to harvest potatoes from grow bags
If you want tender new potatoes, you can check the bag shortly after flowering begins. If you want a fuller storage harvest, wait until the tops yellow and die back. At that point, stop watering for a short period so the skins can firm up before harvest.
One advantage of grow bags is that harvest is easy. Tip the bag out onto a tarp or into a wheelbarrow and sort through the mix by hand. This is much gentler than stabbing around in the ground with a fork.
How to store the harvest
Brush off excess soil and let the potatoes dry in a cool, shaded, well-ventilated spot. Do not wash them before storage unless you plan to use them right away. Once the skins are dry and set, keep them in a cool, dark place with airflow.
Any green potatoes or badly damaged ones should be separated from the good storage crop.
Quick FAQ
How many seed potatoes go in one grow bag?
That depends on bag size, but fewer is usually better than overcrowding. A typical 10 to 15 gallon bag is often best with just a few seed potatoes rather than packing it full.
Do potatoes grow better in bags or buckets?
Both can work. Grow bags usually drain better and are easier to store, while buckets hold shape and sometimes hold moisture a little longer. The better choice depends on your heat, wind, and watering habits.
Can you reuse potato grow-bag soil?
You can reuse it for other crops after refreshing it, but it is usually smarter not to run potatoes in the same tired mix over and over without improvement.
Do grow bags dry out too fast for potatoes?
They can in hot or windy weather, which is why daily checks matter once the plants are large. The answer is usually a bigger bag and deeper watering, not abandoning the method.
The short version
Potatoes do well in grow bags when the bag is large enough, the mix drains well, the stems are hilled gradually, and the moisture stays even. Keep tubers covered, do not crowd the bag, and treat watering as a check-and-respond job instead of a fixed schedule. That is what turns a floppy fabric bag into a real harvest.